Me toca investigar un tema relativamente interesante:
Como invocar una API REST via POST para comunicar novedades de los cambios que vayan sufriendo las tablas de una base de datos Oracle 11g via trigger y stored procedure:
En la recopilación, me encontrado como siempre la información fragmentada y confusa. Lo que pretendo con este articulo es clarificar los pasos a seguir sin vueltas:
a trabajar !
— Como Sysdba de la DB creamos un usuario común que ejecutará las consultas a la DB que dispararán el trigger que generará por via de un Stored procedure una call a la API REST via POST con parámetros por su puesto.
— Como sysdba:
set serveroutput on;
exec dbms_output.enable(1000000000);
set escape ‘\’
CREATE USER APIREST IDENTIFIED BY APIREST;
GRANT CREATE SESSION TO APIREST;
GRANT CREATE VIEW TO APIREST;
GRANT CREATE TABLE TO APIREST;
GRANT UNLIMITED TABLESPACE TO APIREST;
GRANT CREATE SEQUENCE TO APIREST;
GRANT create procedure TO APIREST;
GRANT create trigger to APIREST;
grant execute on utl_http to APIREST
grant execute on dbms_lock to APIREST
BEGIN
DBMS_NETWORK_ACL_ADMIN.create_acl (
acl => ‘local_sx_acl_file.xml’,
description => ‘A test of the ACL functionality’,
principal => ‘APIREST’,
is_grant => TRUE,
privilege => ‘connect’,
start_date => SYSTIMESTAMP,
end_date => NULL);
COMMIT;
end;
/
begin
DBMS_NETWORK_ACL_ADMIN.assign_acl (
acl => ‘local_sx_acl_file.xml’,
host => ‘10.9.4.99’,
lower_port => 8161,
upper_port => NULL);
COMMIT;
end;
/
— LOGIN CON APIREST
— Usando la funcionalidad
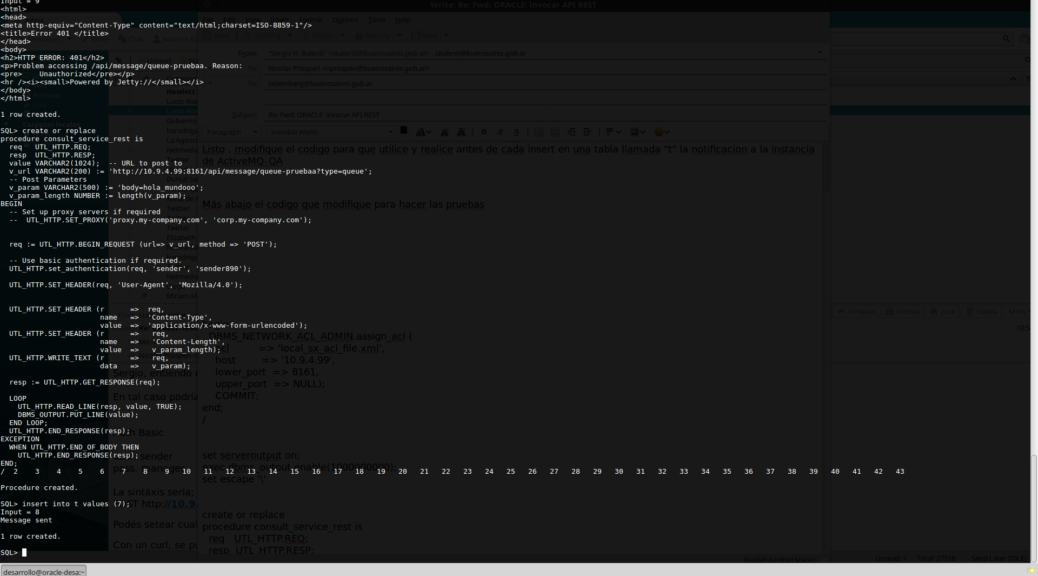
create or replace
procedure consult_service_rest is
req UTL_HTTP.REQ;
resp UTL_HTTP.RESP;
value VARCHAR2(1024); — URL to post to
v_url VARCHAR2(200) := ‘http://10.9.4.99:8161/api/message/queue-pruebaa?type=queue’;
— Post Parameters
v_param VARCHAR2(500) := ‘body=hola_mundooo’;
v_param_length NUMBER := length(v_param);
BEGIN
req := UTL_HTTP.BEGIN_REQUEST (url=> v_url, method => ‘POST’);
— Use basic authentication if required.
UTL_HTTP.set_authentication(req, ‘sender’, ‘sender890’);
UTL_HTTP.SET_HEADER(req, ‘User-Agent’, ‘Mozilla/4.0’);
UTL_HTTP.SET_HEADER (r => req,
name => ‘Content-Type’,
value => ‘application/x-www-form-urlencoded’);
UTL_HTTP.SET_HEADER (r => req,
name => ‘Content-Length’,
value => v_param_length);
UTL_HTTP.WRITE_TEXT (r => req,
data => v_param);
resp := UTL_HTTP.GET_RESPONSE(req);
LOOP
UTL_HTTP.READ_LINE(resp, value, TRUE);
DBMS_OUTPUT.PUT_LINE(value);
END LOOP;
UTL_HTTP.END_RESPONSE(resp);
EXCEPTION
WHEN UTL_HTTP.END_OF_BODY THEN
UTL_HTTP.END_RESPONSE(resp);
END;
/
— prueba invocando un HTTP request directamente
begin
consult_service_rest;
end;
/
SEGUNDA PARTE: Trigger que antes de insert en una tabla invoque el Store consult_service_rest;
create table t (
x int
);
create or replace function f (p int)
return int as
begin
return p + 1;
end;
/
create or replace procedure p (p int) is
begin
dbms_output.put_line(‘Input = ‘ || p);
end p;
/
create or replace trigger trig
before insert on t FOR EACH ROW
declare
l int;
begin
l := f(:NEW.x);
p(l);
consult_service_rest;
end;
/
SQL> set serveroutput on
SQL> insert into t values (1);
Input = 2
Message Sent
Problemas que surgieron sobre la marcha:
A.– Ver si la ACL está bien establecida
http://dba-oracle.com/t_ora_24247_network_access_denied_by_access_control_list_tips.htm
select utl_http.request(‘http://10.9.4.199:8080/alfresco/faces/jsp/dashboards/container.jsp’) from dual;
B.- Certificado invalidos y no importados a wallet de oracle
http://blog.whitehorses.nl/2010/05/27/access-to-https-via-utl_http-using-the-orapki-wallet-command/
1.- con firefox, exportar en el x.509 Certificate PEM cada uno de los certificados desde el propio sitio hasta la autoridad certificante
2.- mkdir /home/oracle/wallet
3. -orapki wallet create -wallet /home/oracle/wallet -pwd password123 -auto_login
4.- scp los archivos de certificados a esa ruta del wallet
5.- agregar los certificados DESDE la CA hasta el propio sitio (al revez de como lo exportaste)
$ orapki wallet add -wallet /home/oracle/wallet -trusted_cert -cert COMODORSACertificationAuthority.crt -pwd password123
$ orapki wallet add -wallet /home/oracle/wallet -trusted_cert -cert COMODORSAOrganizationValidationSecureServerCA.crt -pwd password123
$ orapki wallet add -wallet /home/oracle/wallet -trusted_cert -cert gcbagobar.crt -pwd password123
6.- Comprobar que se hayan importado:
orapki wallet display -wallet /home/oracle/wallet -pwd password123
7.- Ahora a usarlo:
select utl_http.request(‘https://esb.gcba.gob.ar/infomet/historico/20171212′, NULL,’file:/home/oracle/wallet’,’password123′) from dual;

